Predict S&P Using Google Colab & Facebook Prophet

A few years ago Facebook decided to open source Prophet. This is their analytics algorithm that uses an additive model to fit non-linear data with seasonality. I started to wonder, “If this algorithm were in place in March when the stock market’s crashed what would it have advised?” So I decided to give it a spin.

Let’s assume you had a significant amount of money invested in S&P index funds on March 23, 2020. Since the beginning of the year, you would have lost 31% of your money. At this point you might be thinking, “Oh shit, what do I do, sell, buy, hold?”. A lot of investors would panic and sell. The market thrives and two psychologies, fear and greed.

But let’s take an analytics approach to this problem. What would Facebook’s Prophet algorithm advise you do to? Here is how you can approach that problem.

The first thing I did was fire up Google Colab. The entire notebook can be found here.

The first part of this code uses a Python DataReader to pull SPY from Yahoo Finance. I created an end date of 3/23/2020. This only gives Facebook’s Prophet access to data up until this point. We are then going to have it predict where it thinks the price would be today 8/20/2020 without feeding it any future data.

# Python
import pandas as pd
from fbprophet import Prophet

from pandas_datareader import data as web
import datetime

import pandas as pd
import matplotlib.pyplot as plt

stock = 'spy'
endDate = datetime.datetime(2020, 3, 23)
#start_date = (datetime.datetime.now() - datetime.timedelta(days=2000)).strftime("%m-%d-%Y")
start_date = (endDate - datetime.timedelta(days=2000)).strftime("%m-%d-%Y")
#print(start_date)
df = web.DataReader(stock, data_source='yahoo', start=start_date,end=endDate)
#date is the index so you need to make it a column
df["Date"] = df.index

import matplotlib.pyplot as plt

plt.plot(df['Close'])
df.head()
df.tail()

The next part of code renames the imported columns from “Date” to “ds” and “Close” to “y”. DS and Y are the two variables that Prophet will be looking for.

# Python
df = df.rename(columns={"Date": "ds", "Close": "y"}, errors="raise")

This next part of the code starts to set up Prophet. The only variable you should be concerned with is 151. This is telling the algorithm to look out 151 days. Then it forecasts three variables yhat, yhat_lower, and yhat_upper. Yhat is the predicted price with upper and lower being the bounds in which it assumes the price will fall in.

# Python
m = Prophet()
m.fit(df)
future = m.make_future_dataframe(periods=151)
forecast = m.predict(future)
forecast[['ds', 'yhat', 'yhat_lower', 'yhat_upper']].tail()

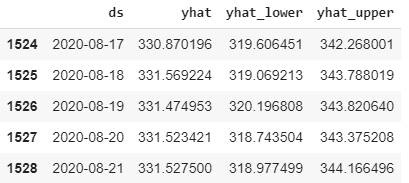
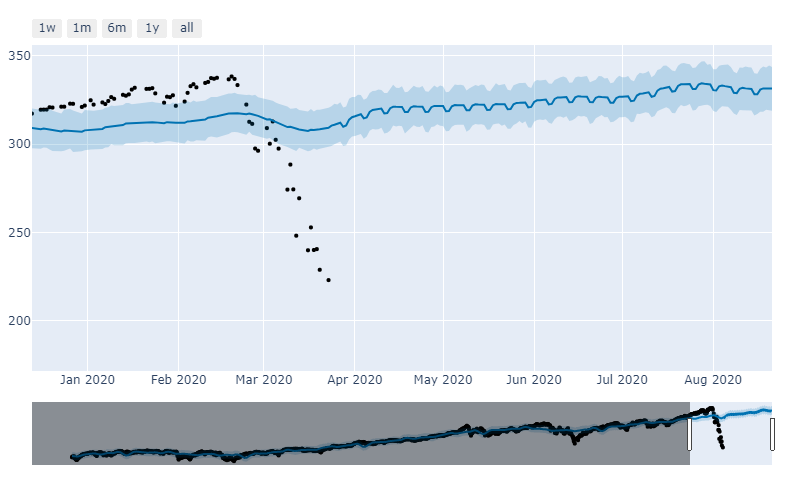
You can see that it predicts the closing price for tomorrow will be 331.52. Remember it is only using data from March 23rd to make this calculation. Given the wild gyrations in the market, this is extremely close to being accurate. The SPY closed today at 338. Prophet predicted it would close at 331. It was off by 2%. This is using a 5-month look ahead forecasting model.

Here is the visual representation of what that looks like.

from fbprophet.plot import plot_plotly, plot_components_plotly

plot_plotly(m, forecast)
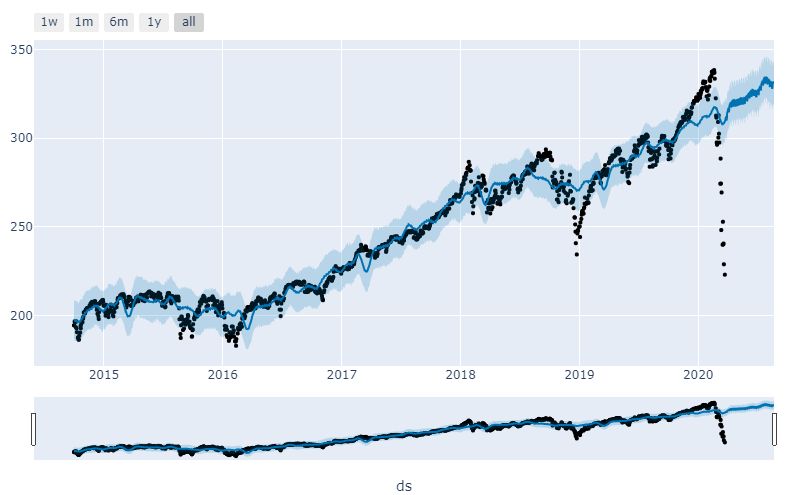
And more charts…

plot_components_plotly(m, forecast)

Finally here is the visualization of the predicted price vs. the actual price chart.

Whittaker volatility breakout indicator

I no longer trade using Metatrader. I noticed users kept hitting an invalid link on my website to this search phrase. So the purpose of this post is to catch those invalid links related to Metatrader. I would recommend learning Python and custom developing your algorithms. It will be much more rewarding.

I wanted to share with everyone an indicator that I programmed and I find very useful. It is called the Whittaker Volatility Breakout Indicator or WVBI. The purpose of this indicator is to represent the range of a bar in percentage terms rather than in points. I think the flaw of most traders or programmers is they often write code and optimize it for pips of a given pair. This I truly believe is one of the core fundamental flaws of sustainability of a strategy. When people start programming static values. Whether it be in money management, entries, exits, or take profit levels.

What this indicator does is as follows:

  1. Takes the range(high-low) the last x bars.
  2. Averages the range of the last x bars.
  3. Displays as a histogram the percentage of change from the average.
  4. Takes an average of the percentage of change from the average.
  5. Allows you to set a horizontal line at your preference so you can see when the average is breaking out.

This indicator has 3 inputs:

  1. “ATRPeriod” which allows you to specify the amount of bars to average out for the Average True Range of that period
  2. “WVBIAverage” is a setting that allows you to specify the amount of bars to which will be the average of the percentage of the ATR.
  3. The last setting is pretty straightforward it is “TooFar”.  This simply will draw a horizontal line across the indicator so that you can visually see where the percentage is in comparison to other bars.  Its purpose is to simply put things in perspective.

All of this might seem confusing at first. However, I assure you this a very useful indicator for detecting volatility in a market.

You can see from this example of above the bar in question exceed it’s 14 day ATR by 203.95%.

Attached are zip files I had or that I was working on for Metatrader. I don’t know if they’re up to date, if they work, or support them in any form.

Setting up MetaTrader for better backtesting quality

I no longer trade using Metatrader. I noticed users kept hitting an invalid link on my website to this search phrase. So the purpose of this post is to catch those invalid links related to Metatrader. I would recommend learning Python and custom developing your algorithms. It will be much more rewarding.

If you’re working with a default installation of MT4 or Metatrader chances are you modeling quality is not very good. I have composed this post to show how I import data into MT4 for better backtesting performance.

First thing you need is high quality historical data in CSV format. I have found Forex Tester to be very beneficial for that, http://www.forextester.com/data/datasources.html.

1. You will want to download the file that pertains to the pair you will be trading.

2. The next step is unzipping the file using a simple Zip program.

3. Before proceeding to import your new data you will want to go ahead and delete all of your old data first. So that you are not mixing the two up. If you are running Windows7 or Windows Vista you have to look in two locations for the .hst files and delete all of them. If however you are running Windows XP you need to only look in one. These locations can vary greatly depending what broker you download your platform from. I use Interbank but you will have to look and mind and figure out where yours are. Or you can just search your entire hard drive for *.hst files.
C:\Program Files (x86)\Interbank FX Trader 4 – B\history
C:\Users\%username%\AppData\Local\VirtualStore\Program Files (x86)\Interbank FX Trader 4 – B\history\IBFX-MT4 Mini-2

4. Now that you have unzipped the files they should be in .CSV format. From here you can now open your Metatrader platform. Then go to tools>options click on the chart tab and change the “max bars in history” and “max bars in chart” to 999999999. Once you close this window Metatrader will adjust to the highest possible setting automatically.

5. You will now want to go to tools>history center. Double click your currency pair that you are trying to import. Then double click on the 1m timeframe underneath it. Now click on the import button. Browse to the location of the .txt file that you extracted in step 2. You may have to change the rows setting to 0. If it works correctly you will be able to see every row from the file that you are importing. Click ok and all of your 1m data is now complete.

6. The next step is to generate your 5m 10m 30m 60m 240m 1440m and 10080m data. This will get all of the commonly used timeframes. You can also do custom ones if you wish.

7. To do this you need to go to navigator from Metatrader terminal. Select the scripts from the navigator window and look for one named “period_converter”.

8. Open a 1m chart of the currency pair that you just imported.

9. Now double click on period_converter

10. It’s going to ask you for an input labeled “ExtPeriodMultiplier”. The default value is 3. Change this to 5 to generate your 5 minute chart data.

11. If you have your terminal window open in Metatrader select the experts tab. You will see something that says period_converter GBPUSDm,M1: 726279 record(s) written. This is how you know it is complete.

12. Double click period converter again. This time select 10 for 10 minute chart. Continue doing steps 10 and 11 until you have created your 5m 10m 30m 60m 240m 1440m and 10080m data. You are now ready to move on to your next currency pair.

Attached are zip files I had or that I was working on for Metatrader. I don’t know if they’re up to date, if they work, or support them in any form.